INTRODUCTION
Thank you for choosing Lift Foils.
The Lift Charger is designed exclusively for:
- Gen5 Full Range Battery
- LIFTX Battery
COMPONENTS
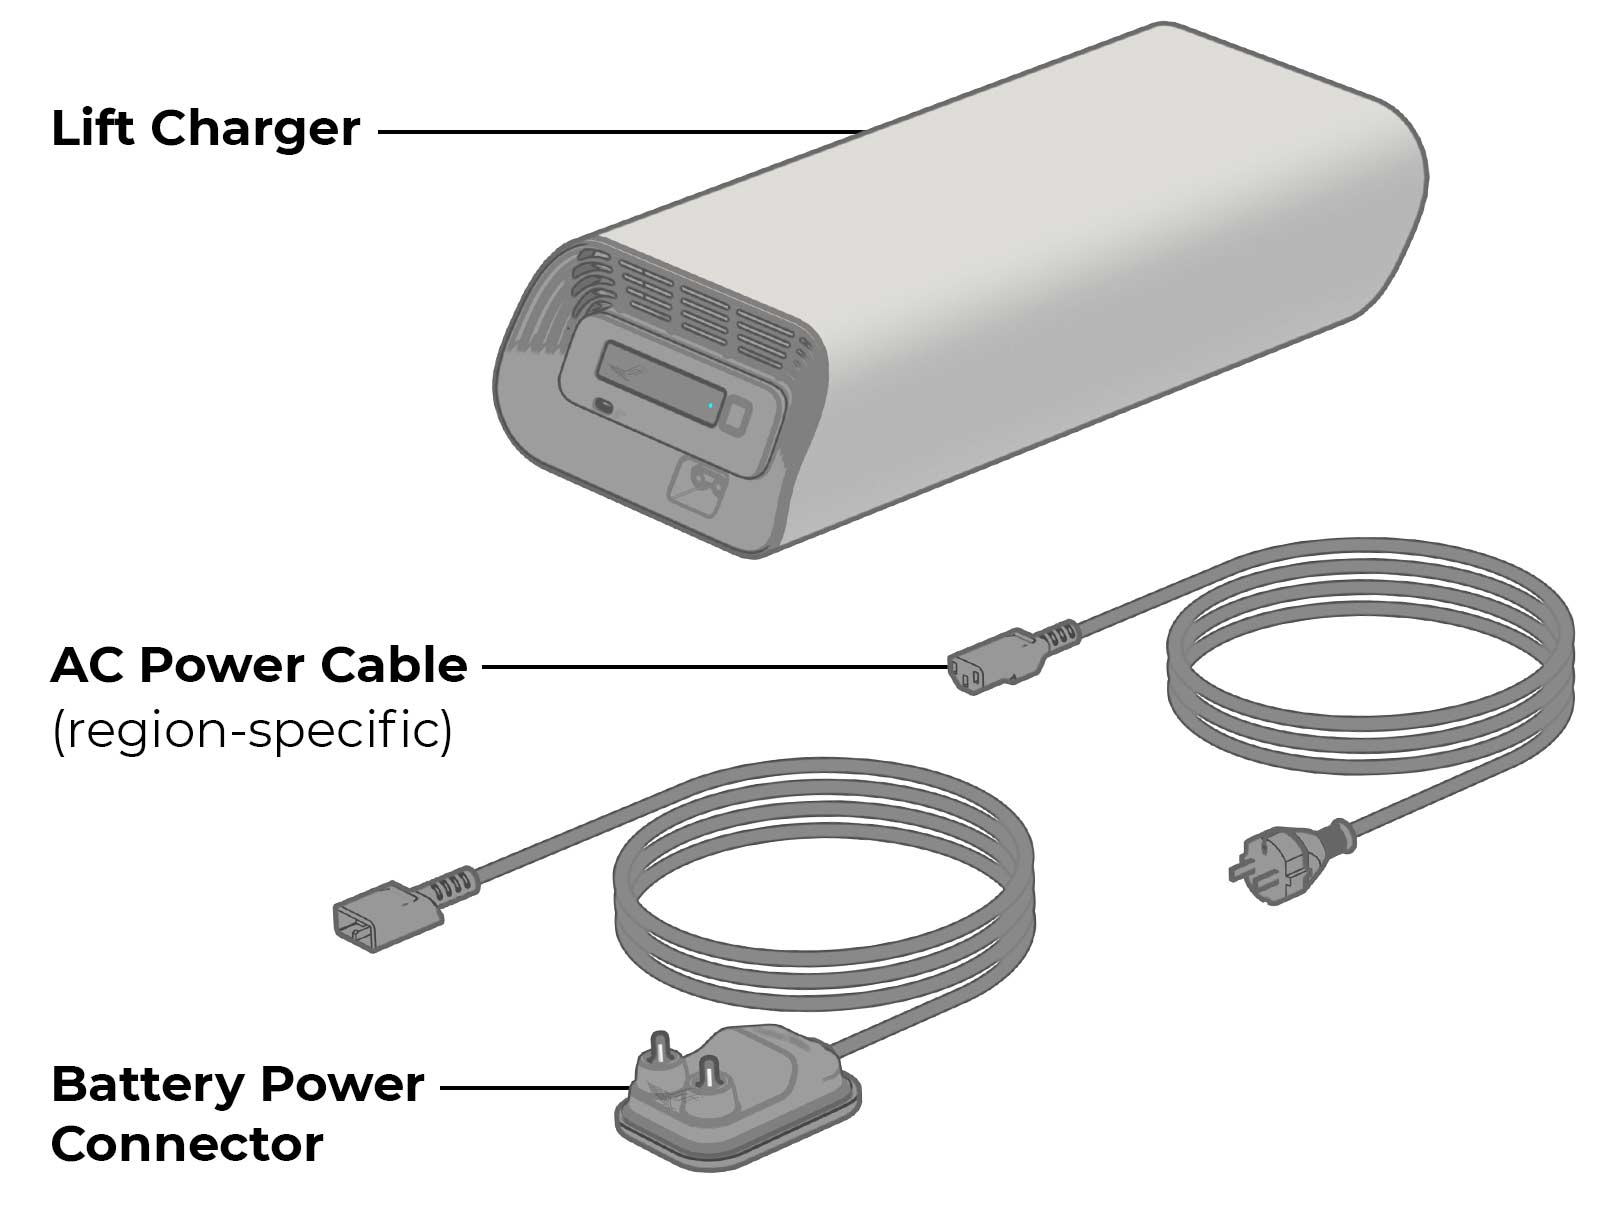
What’s Included:
- Lift Charger
- AC Power Cable (region-specific)
- Battery Power Connector
COMPATIBILITY
The Lift Charger is compatible with the following batteries:
- Gen5 Full Range Battery (Battery for the LIFT5 eFoils)
- LIFTX Battery (Battery for the LIFTX eFoils)
Both batteries share the same wireless communication and charge-control platform.
The Lift Charger is not compatible with:
- Gen4 or earlier Lift Foils batteries.
- Any battery that requires a wired data cable.
- Any non-Lift batteries or aftermarket products.
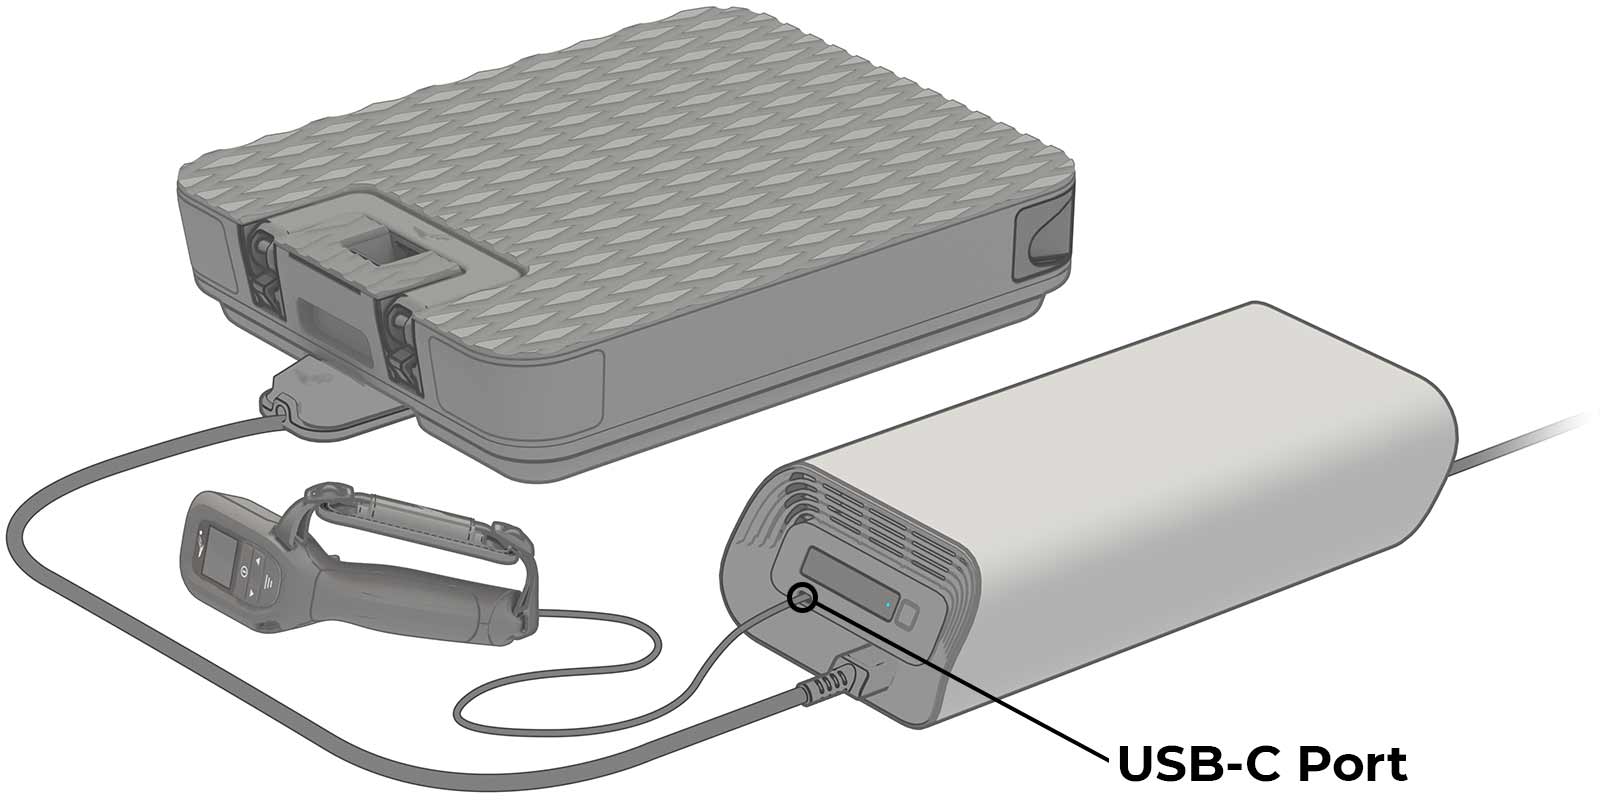
The Lift Charger is equipped with a USB-C port designed to charge the Lift Hand Controller, or Elite Hand Controller using the provided cable.
LED GUIDES
Below are reference guides for the LED indicators on the Lift Charger and the Gen5 and LIFTX Batteries.
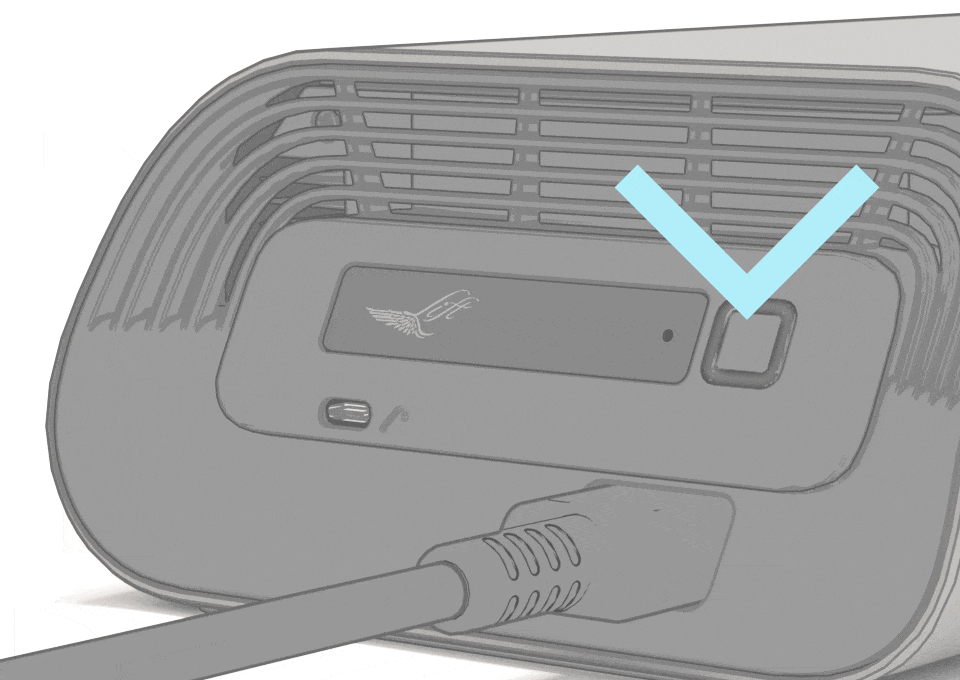
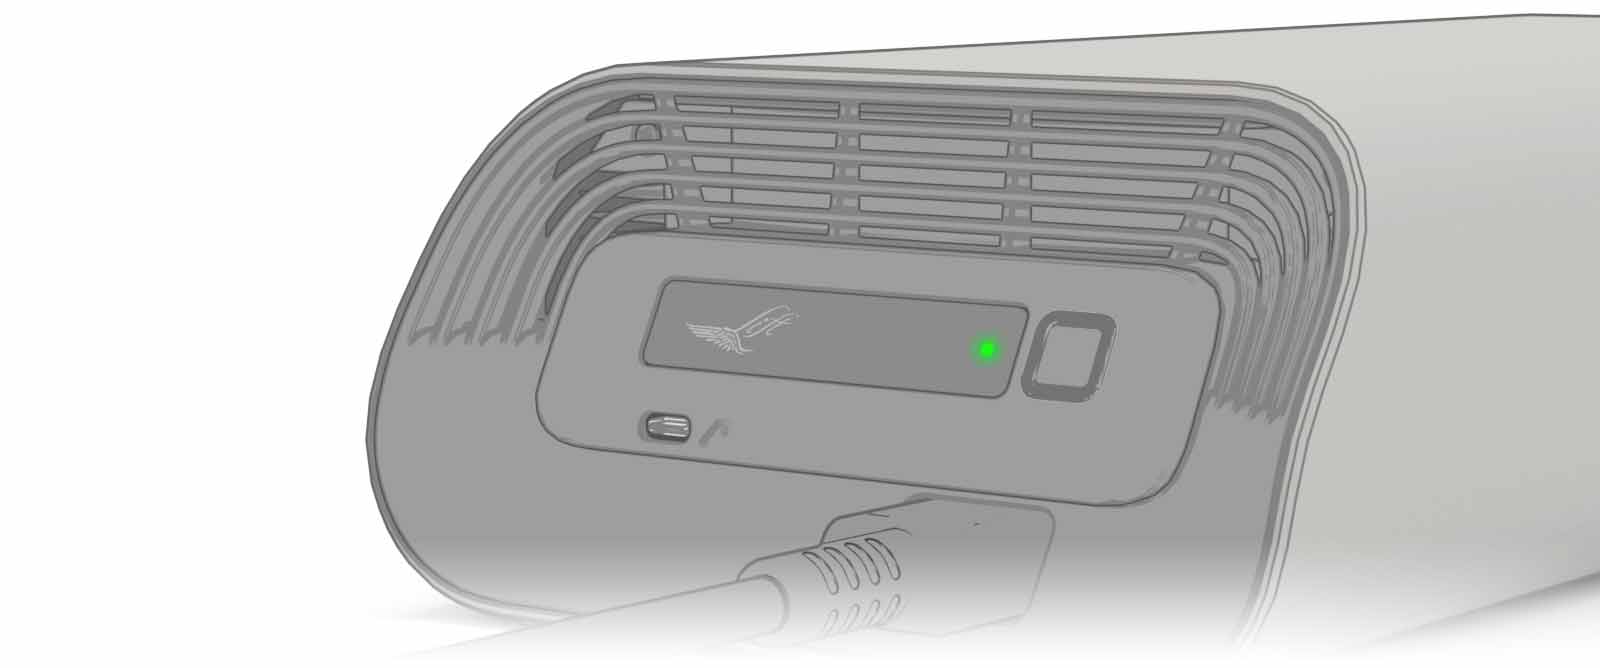
LIFT CHARGER LED GUIDE


LED: Blue Flashing
STATUS: Searching
DETAILS: The charger is searching to pair with a battery.

LED: Blue Static
STATUS: Paired to Battery
DETAILS: The charger is paired with the connected battery and is preparing to charge.

LED: Green Flashing
STATUS: Charging
DETAILS: The charger is actively charging the connected battery.

LED: Green Static
STATUS: Charged
DETAILS: Charging is complete. (i.e. Both the battery and charger are in standby mode)

LED: Magenta
STATUS: Updating Firmware
DETAILS: The charger is connected to a smartphone, and a charger firmware update is underway.

LED: Amber
STATUS: Error/Fault
DETAILS: A fault or charging issue has been detected.
GEN5 & LIFTX BATTERY
LED GUIDE
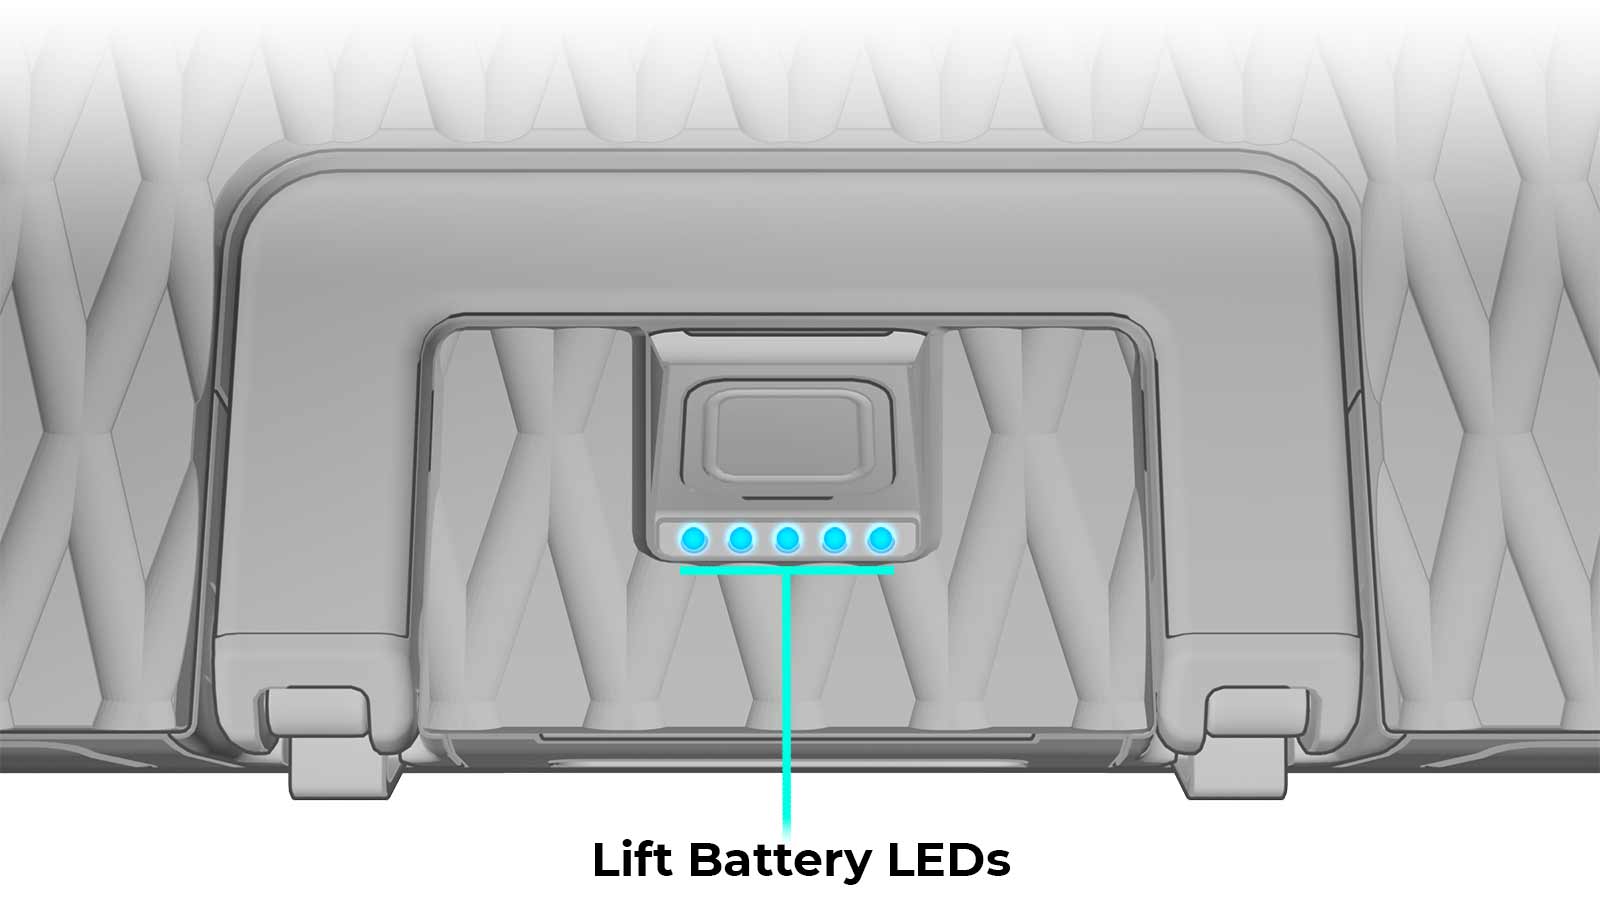
NOTE: The LED sequences are the same for both the Gen5 and LIFTX batteries.
IMPORTANT: Several of the LED sequences of the Gen5 and LIFTX batteries will display multiple colors.

LED: Blue-Flashing Blue
STATUS: Searching
DETAILS: The battery is in pairing mode, searching for a charger or a board connection.

LED: Blue-Green-Flashing Blue
STATUS: Pairing
DETAILS: The battery has found the charger and is actively establishing a connection.

LED: Single Green LED -> Multiple Green LEDs
STATUS: Charging Progress
DETAILS: The battery’s LEDs will switch from flashing to solid green as the battery SOC increases (during the charging process).

LED: All LEDs Solid Green
STATUS: Charged
DETAILS: The battery is fully charged.

LED: Blue-Green
STATUS: Charging Complete
DETAILS: Charging is complete. The battery is in standby mode.

LED: Magenta
STATUS: Updating Firmware
DETAILS: The battery is connected to a smartphone, and/or a battery firmware update is underway.

LED: Flashing Amber
STATUS: Error/Fault
DETAILS: A battery fault or charging issue has been detected. If the flashing amber LED persists, please contact Lift Technical Support.
NOTE: If the LED sequence is showing any Amber LEDs, regardless of which LED is Amber, this indicates an error or fault. If the flashing amber LED persists, please contact Lift Customer Support.

LED: Red
STATUS: Error/Fault
DETAILS: A critical fault or error has been detected. Stop use of the battery, and contact Lift Technical Support immediately.
NOTE: If the LED sequence is showing any Red LEDs, regardless of which LED is Red, this indicates a severe or critical fault. Stop use of the battery and contact Lift Customer Support immediately.
CHARGING PROCEDURE
NOTE: This charging process is the same for either a Gen5 or LIFTX Battery.
NOTE: Do not charge the battery unattended.
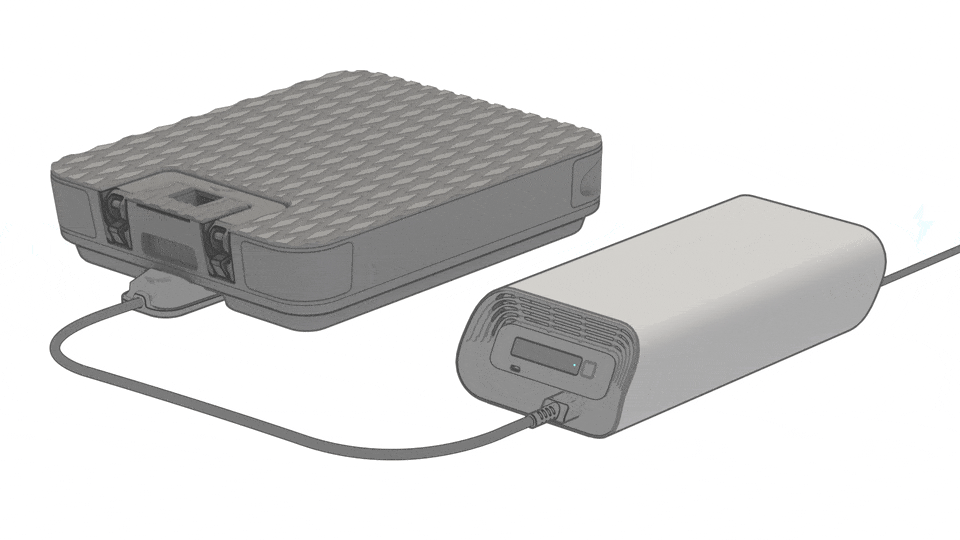
STEP 1 : Prepare the Battery
- Place the battery on a clean, flat, dry surface.
- Ensure the battery is cool and completely dry, especially around the charging port.
- Verify the charging port (also called the battery connector sockets) is free of sand, debris, or corrosion.
- Ensure the battery is powered off. Do not plug the battery into the charger with the battery powered on.
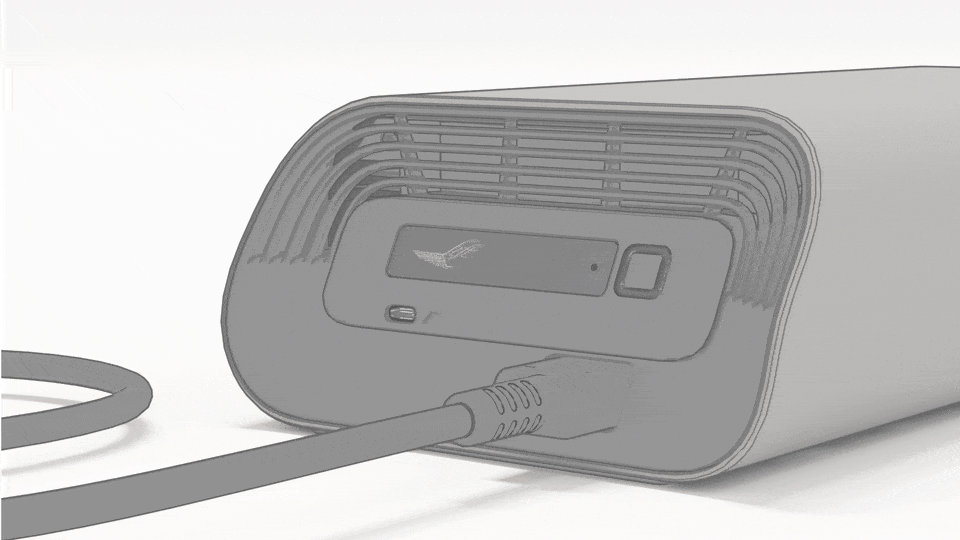
STEP 2: Connect the Battery Power Connector

- Ensure the Battery Power Connector is fully seated within the front port of the charger.
- It’s recommended the battery handle be in the closed (i.e. nested) position when connecting to the Battery Power Connector for charging.
- Orient the Battery Power Connector to the battery’s charge port and insert fully.
STEP 3: Plug the Charger into the Wall Outlet
- Ensure the AC Power Cable is fully seated within the AC port at the rear of the charger.
- Plug the AC Power Cable into a grounded AC outlet. It is recommended to use a dedicated circuit when possible (High-power chargers like the Lift Charger can draw significant current).
STEP 4: Wireless Handshake & Charging Start
- Press and hold the charger button for 1 second to power on the charger. Powering it on automatically places the charger into pairing mode. There will be a flashing blue LED seen on the front panel of the charger, indicating it is in pairing mode.

- With the battery connected, press and hold the battery button for 3 seconds to turn on and start up the battery. You will know the battery is turned on when the battery displays one solid blue LED and a second flashing blue LED. This indicates the battery is on and ready to connect.
- There will be blue-green-flashing blue LEDs on the battery when a connection has been established with the charger. The charger LED will illuminate green, and the battery LEDs will then begin flashing green while charging is underway.
- Stop charging at any time with a long press of the charger button.
STEP 5: Monitor Charging
- The battery LEDs indicate the charge progress of the battery.
- The charger fan may turn on automatically to cool the charger. This is normal and expected behavior. Do not cover the charger or block airflow.
- The charger may warm up. This is normal.
STEP 6: Ending Charge & Disconnecting
When the battery fully charged:

- All 5 battery LEDs will show solid green LEDs momentarily, then return to a blue-green pattern when complete. This indicates the charger is no longer charging, and both the battery and charger and in a ‘standby’ mode.
- The charger LED will show solid green.
NOTE: Depending on the battery model as well as its initial state of charge (SOC), it could take over 2 hours to reach a full charge.
WARNING: To disconnect, FOLLOW THIS PROCEDURE IN ORDER to avoid any charger or battery errors:

- Turn off the battery with a long press of the battery button.
- Turn off the charger with a long press (~1 second) of the charger button.
- Unplug the charger from the wall outlet.
- Remove battery from the Battery Power Connector.
IMPORTANT: Never remove the Battery Power Connector from the battery while the charger is plugged into the wall.
STORAGE & MAINTENANCE
Store the Lift Charger in a cool, dry, temperature-controller location, keeping it out of direct sunlight.
- Wipe with a dry cloth only.
- Do not expose the charger to moisture or salt air.
- Keep water, dust, and debris away from the charger vents.
- Do not coil the AC Power Cable or Battery Power Connector too tightly.
Temperature Guidelines:
- Charging Temperature: 10°C–40°C (50°F–104°F)
- Storage Temperature: 10°C–25°C (50°F–77°F)
IMPORTANT: Never store or charge the battery in direct sunlight, inside a vehicle, or in high heat.
TROUBLESHOOTING
Below are some common issues you may encounter when using the Lift Charger, along with possible causes and solutions. For more help, contact Lift Customer Support.

ISSUE: The charger LED remains blue, but the battery is not charging.
POSSIBLE CAUSE 1: The required wireless handshake between the battery and charger was not properly established.
POSSIBLE SOLUTION 1: Power down battery and charger, pull the charger plug from the outlet, and disconnect the battery from the charger. Wait 10 seconds, reconnect your equipment in the correct order, and start up using the proper charging procedure.
POSSIBLE CAUSE 2: More than one charger is plugged in nearby. Chargers that are powered on may still be sending a Bluetooth signal, even if they are not connected to a battery. This can cause the battery to try to connect to the wrong charger and prevent charging. The battery may be trying to connect to a different charger instead of the one attached to it.
POSSIBLE SOLUTION 2: Unplug any other chargers that are connected to wall outlets nearby. After unplugging the other chargers, try connecting and charging the battery again.
ISSUE: The battery is charging very slowly.
POSSIBLE CAUSE: The battery and/or charger temperatures are too high.
POSSIBLE SOLUTION: Power down battery and charger, disconnect from charger, and allow battery and charger to cool.
NOTE: The battery will not charge if it is too hot, even if it is connected to the charger.
ISSUE: An amber LED is displayed on the charger.
POSSIBLE CAUSE 1: There was an abrupt battery disconnection (i.e. not following the proper disconnect procedure), or there is a poor connection.
POSSIBLE SOLUTION 1: Follow proper disconnection steps and guidelines. Verify all connection points are properly seated.
POSSIBLE CAUSE 2: The temperature limit was exceeded on the battery and/or the charger.
POSSIBLE SOLUTION 2: Power down both the battery and charger, disconnect the battery from the charger, and allow battery and charger to cool.
NOTE: The battery will not charge if it is too hot, even if it is connected to the charger.
ISSUE: The charger is very warm to the touch.
POSSIBLE CAUSE: This is normal and expected while actively charging a battery.
POSSIBLE SOLUTION: Ensure there is proper ventilation around the charger. Do not cover the charger while in use, paying close attention to the fans.
SAFETY WARNINGS
General Warnings:
- Only use the Lift Charger with compatible Gen5 and LIFTX batteries and follow all manufacturer instructions. This charger is not compatible with Gen4 or previous generation Lift batteries.
- Do NOT charge immediately after riding; allow the battery to cool.
- Do NOT use the charger outdoors, near water, or where salt mist can reach the battery or charger.
- Do NOT expose the charger to heavy rain, immersion, high-pressure water, or heavy dust.
- Keep the charger and battery dry at all times.
- Allow adequate airflow around the charger; do not cover it.
- Do NOT use extension cords when possible. NEVER leave the battery charging unattended for prolonged periods.
- NEVER attempt to bypass wireless data communication.
- Do NOT disassemble the charger. No user serviceable parts inside.
- If the charger or cables are damaged, discontinue use immediately.
- Do NOT charge if the battery is hot, swollen, leaking, or physically damaged.
Danger
- Risk of electrical shock. Do not touch uninsulated portions of the output connector or uninsulated battery terminals. Only connect to a properly grounded AC outlet.
- Avoid exposure to direct sun, heat, flames, or sparks.
- Disconnect AC supply before making or breaking connections to the battery.
Caution
- Surfaces may be hot. Do not touch to avoid risk of burns.
CONTACT
When you purchase Lift Foils products, you are investing in a lifetime of customer care, new technology, and new frontiers. If you have questions about your Lift eFoil, accessories, or other gear, please contact us.
For customer support and troubleshooting with your eFoil, use the Lift Foils app.
For further technical support, product questions, or new orders:
- Call: +1 (888) 333-3045
- Email: orders@liftfoils.com
TECHNICAL SPECIFICATIONS
- Dimensions: 14.25″ x 7″ x 3.6”
- Weight: 12.3 lbs. (5.6 kg)
- Input: 100–240V~ AC, 50-60Hz, 15A (Max)
- Output: 58.8V DC, 20A, 1176W
- Cooling: Passive or fan-assisted
REGULATORY INFORMATION

This device complies with Part 15 of the FCC Rule. Operation is subject to the following two conditions: 1. This device may not cause harmful interference 2. This device must accept any interference received, including interference that may cause undesired operation.
This device has been tested and found to comply with the limits for a Class B digital device, pursuant to Part 15 of the FCC Rules. These limits are designed to provide reasonable protection against harmful interference in a residential installation. This equipment generates, uses and can radiate radio frequency energy and, if not installed and used in accordance with the instructions, may cause harmful interference to radio communications. However, there is no guarantee that interference will not occur in a particular installation.